Steps to create Facebook & Instagram catalogs
In case, you are unable to setup a store on Facebook or Instagram (Social Media Marketing), or you wish to manage multiple catalogs and also want to give some agency an access to your catalog, then the best option is the Business Manager tool. It is a free and easy-to-use tool, to make your task effortless, by managing all your ad accounts and pages at a single place. Through the Business Manager tool, you can create catalogs for both Facebook and Instagram. In this, you can consider your catalog, as a container, to hold inventory.
To show various items in a collection ad or tag products on Instagram, you need a catalog. Also, a Facebook page and a Facebook ad account is needed if you wish to run ads for your catalog, otherwise, just a Business Manager account is sufficient.
Step 1: Creating a business manager account
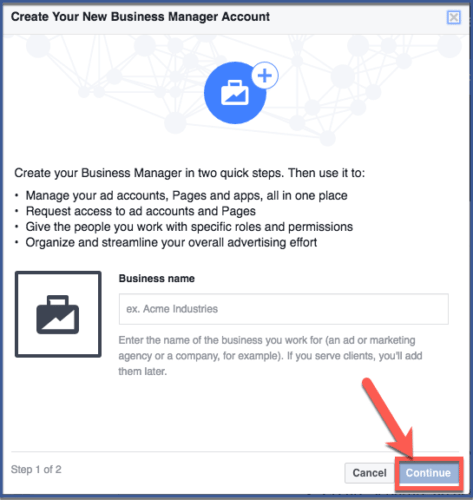
To make a Business account, your Business name and E-mail address are required. You can use a Business Email address different from your personal Email address, so that the Business Manager account can be separate.
Step 2: Creating your catalog
To make a list, go to Catalog Manager and click “Make Catalog.”
Choose the type of catalog you need (alternatives are internet business, travel, land, and auto) and click “Next.”
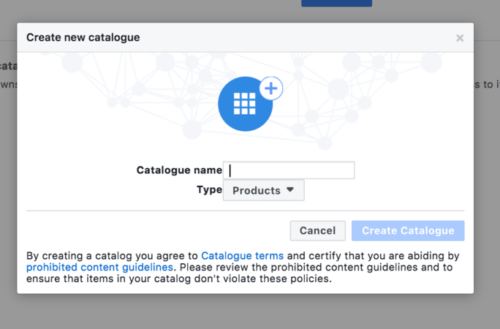
Select the type of business catalog, give it a name, and click “Create.”
Repeat the process from the beginning, if you want the same catalog in more than one language.
Step 3: Adding items to your catalog
There are different ways to add items to your catalog. You can add them manually, use a data feed, merchant platform, or Facebook pixel.
Manually Adding Items
If you choose less than 50 items in an e-commerce catalog, manually including the gadgets is an option. You’ll need to click “Add Products” as soon as you’ve finished setting up your catalog and choose “Add Manually.” For each item, you need to enter a title of no more than 26 characters and the price. The default currency is US dollars, but if you trade the currency for one item, it will remain for all subsequent items. In Case, you want to run dynamic ads, you’ll also need to add a Content ID. Save every product via clicking “Add Product” and create greater with the aid of clicking “Add Another Product.”
Adding with a Data Feed
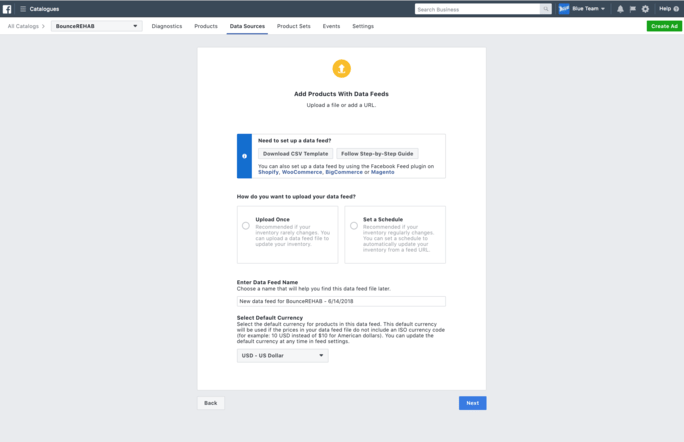
Adding gadgets the usage of a statistics feed offers you the hazard to promote your catalog via retargeting, such as with dynamic ads. To start, open a supported file layout for the feed. Options are CSV, TSV, and XML. For actual estate listings, you need to use XML. Once you’ve created a records feed file with all the fundamental information, retailer the file. You can take a look at it earlier than you upload to Facebook with the product feed debugger tool.
- To add the feed to your catalog, head to Catalog Manager, choose the catalog you want, and click “Data Sources.”
- Choose “Add Data Source,” then “Use Data Feeds,” and click on “Next.”
- Opt whether you want to upload once or want to set a schedule.
- Select add, if you are not going to make everyday adjustments to your catalog. Any modifications will require importing the feed again. By placing a schedule, however, you can have Facebook take a look at for updates to your feed hourly, daily, or weekly.
- This requires importing a feed on an internet site and supplying Facebook with the URL, username, and password.
- Finish through giving your statistics feed a title and deciding on a default currency.
Using a Merchant Platform
If you already have a catalog, on a service provider platform, it will be quicker to upload your catalog without any delay. This is viable with Shopify, BigCommerce, Magento, Google, and WooCommerce.
Using Facebook Pixel
This option is feasible only for e-commerce catalogs. It is beneficial, if at any instance you replace your catalog, as the catalog will replace automatically.
You’ll first want to install the Facebook pixel on your website, pick out the right occasions to track, and install the essential microtags for each item. To continue, a pixel should have been fired in the last seven days. This skill you may need to wait if you have low website traffic. Or you can view an object yourself on the page.
Next, head to Catalog Manager, select the proper catalog, and click on “Data Sources.” Select “Add Data Source” and pick out “Connect Facebook Pixels.” Choose the pixel to partner with the catalog — it will want to meet certain requirements. Click “Next” to upload items to your catalog and click on “Done.”
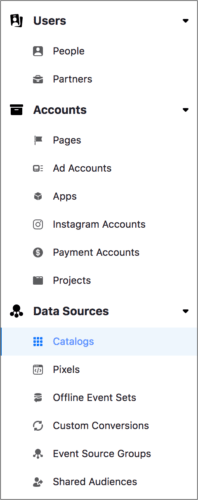
Step 4: Manage the catalogs
You can see all the catalogue you oversee in Business Manager by picking your record and clicking “Information Sources” trailed by “Catalogues.” Here, you can include new clients, accomplices, and things, change consents (the alternatives are administrator and sponsor), and partner sources.

As an agency there is a chance that you can request access to more catalogs. Do this in Business Manager by picking your record and clicking “Information Sources” trailed by “Inventories.” Under “+ Add,” discover the choice “Solicitation Access to Catalog.” You would then be able to decide to add the list to a current Page or to make another Page. Adhere to the rest of the guidelines to complete the process of mentioning access.

You can erase a catalog whenever you want by finding the list and going to “Settings.” At the base of the page, you’ll see the alternative “Erase Catalog.” Clicking this will remove the catalog, its stock, and any related promotions.
When you’ve made a list in Business Manager, you’ll have more chances to publicize on both Facebook and Instagram. For example, this is a perfect method to begin exploiting highlights like shoppable posts on Instagram.